Tuesday, December 27, 2011

Art is Cooler than TV


Art is...Cooler than TV

In my art room I hung two large sheets of butcher paper on my walls below my windows.  One says "Art Is..." and the other says "Today in Art I Learned...".  When my students are finished early with their projects, one of the things they can do is write on the posters.  There are rules (and yes, I have had a couple students break them).  The rules are...write only school appropriate statements on the posters.  Try to think of something more meaningful to say than art is fun or cool (it is both of those things, but we have A LOT of that on the posters...think of something more original to say).  It is not to just write your name on...you must SAY something.  No inappropriate drawings.  The students have completely filled the papers up and I will be replacing them with fresh papers in the new year.  It has touched me, made me smile and laugh and made me realize the impact that art and my class have made on my students.  Writing and fine arts go hand in hand...they are the best ways to express ourselves.  What words can't say the fine arts can...but, words are powerful.  (I have typed out what my students wrote below each picture to make it easier to read, some with their misspellings, some corrected if I thought you just wouldn't be able to tell what it said. :) 
Art is My Life, My Soul, My Generation. Art is Me!
In art I learned that you still can be smart if you mess up.

(Art) helps me learn new things.

I love art because it expresses me.

Art is to show your feeling.
Art is a way to have fun.

Art is...Sweet, Awesume, Cool, Fun, Wonderful.  :)

Art is what you need.

(I learned how to draw a bird. I like birds. I believe that I did a beautiful bird.  I love art!)

That art is for you to express yourself.

(Today in Art I learned) that I am a very good at art.

(Today in Art I Learned) how to draw a blue dog.

(Today in Art I Learned) how to make a fish.  How to do step by step.

(Today in Art I Learned) I love art and myself.

(Today in Art I Learned) Keep Trying.

Art is a way to have fun.

Today I learned how to draw a bird.
Art come from the heart.

Art smart class is cool.

Art is...Radical.
Art is a thing I am addicted to.
I love Art. It is so amaving, asowome, cool for everyone.
Art is cool.

Art is...Creative.

Art you show your felling that come from your heart.
Art is Fun.


Today in Art I Learned...(I learn to draw a bird).

Art fill my heart with joy and Ms. Gallow is the best art teacher.  (Vernecya, you fill MY heart with joy!)

I learn how to make a bird and I like birds.  Mrs. Gallow show us her picture when she was 6 and her picture was beautiful.  (I framed the first drawing I remember making...a bird that I rubbed with a crayon when I was 6 years old.  My mother freaked out when I showed her and said it was the best bird she had ever seen.  She gave me a photo album to put my artwork in and I have had that drawing ever since.  I decided to put it in a frame and bring it into my art room.  My students are always asking me, when did you first start doing art?  What was the first thing you ever drew?  Did you like to draw when you were little?  So, I brought in my bird to show them.  They were just as encouraging as my mother...they all told me how beautiful my bird was.  That's all any of us need is a little encouragement, a little affirmation that what comes from us is good and beautiful, because maybe that means that we are, too.  I'm drawn to art because it brings me joy, and I hope that I can instill that same sense of joy in my students, no matter what they're interested in.  

I love art and I learned how to draw a blue dog and I learned about the artist George Rodrigue.

Art is my way to express myself.  I love Art.


Tuesday, November 22, 2011

Homemade Crayons

If you're like me, there's about a hundred million broken crayons in all types of containers here and there around your art room or your house.  You can't bear to throw them out, because you think one day you'll get around to making something with them.  Well, today's the day!  Here is everything you ever wanted to know about making crayons, but were afraid to ask;

1. Put the broken crayons in a tub or sink.

2. Fill with warm water.

3. After a short period of time, maybe about 15 minutes, the crayon wrappers will come right off.
4. Save the wrappers and dry them for use in collage, or make paper pulp with them. 

5.  You could actually skip this step, but I like to sort my broken crayons in an egg carton before I put them in the baking tray.  This is just to get a supply started that I can keep adding to as the crayons are melting in the oven.  That way, I am ready with more broken crayons already sorted for the next round. Plus, I just like to sort.  :)  The thing I love the most about these crayons are that they are diversity in a square!  Color families live harmoniously together in one square block.  Regular crayons, metallic, construction, glitter, different tints and shades, melting and molding together to make one beautiful crayon.  They are actually a feast for the eyes; to behold a box of them makes my students gasp.  They all say they look good enough to eat, and they do, but I don't recommend it.  :)


6.  To make these cool square crayons, use a silicone brownie bite pan, found in any craft store's cake decorating section.  And yes, you can use any silicone tray with fun shapes for a different type.  The square ones are perfect for the art classroom, because they have several applications; rubbing for textures, filling in large spaces, rubbing out shapes of things and then going over with paint or watercolor markers, and using the corners for making thinner lines.  Spray the pan with baking spray (if you skip this step, it's okay, you'll still be able to get them out of the pan).
7.  Bake at 250 degrees for about 30 minutes.  I like to put mine on an old baking sheet so that it makes it easier taking the molten squares out of the oven. Let cool and harden.


8.  Pop out of pan and behold your little masterpieces!


9.  Hold so that the wide flat edge of the crayon sits flat on the paper and rub.  Give as gifts and they're great for student incentives.  If you have any other tips or tricks with making crayons, please let me know!  I would love to hear your ideas.  And the next time you feel like having a meltdown, grab some broken crayons and make it a productive one!  :)

* I would like to thank my fellow art teachers in Humble I.S.D. for sharing this *recipe* with me.  

Sunday, October 30, 2011

Variations on a Theme


      Pumpkins, Squash and Gourds!  When Fall arrived here in Texas, the only way we knew it was from the displays in the stores.  The trees did not turn, and it is only now getting cool out.  With the long drought we have had to suffer through and the 100+ days of 100+ temperatures, I was ready to usher in Fall!  By far my favorite season for the colors, the smells, the tastes, the temperature and the clothing!  It was time to bring Fall into the art room.  
     I purchased a large pumpkin and a bag of smaller squash and gourds.  A teacher friend, Judi, donated a bag of small pumpkins.  The students were amazed at the sight of the huge pumpkin and the tiny ones, the unusual textures of the squash and gourds.  I passed them around the room for the students to feel and describe before they would draw them.  Then I set them all up on a rolling cart in a still life with a beautiful complementary blue cloth below them.  We discussed the shapes, sizes lines and textures in the still life.  Proportion, overlapping and perspective were also discussed.
    K, 1st, 2nd and 5th grades all drew still lifes in different medias using different elements and principles of art.  Above I've shown three examples; a 5th grade value drawing, a 2nd grade oil pastel drawing and a 1st grade painted paper collage.  The painted paper collage idea I got from the wonderful Deep Space Sparkle sight.  This project was a big hit with beautiful results!  
    If you have any questions about how we went about these lessons, please message me and I'll be happy to share in more detail.  Happy Fall Y'all!!! 

Sunday, October 2, 2011

Color Scheme Portraits


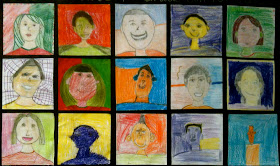
1st through 5th graders started off the school year by creating a self-portrait in an assigned color scheme. 1st grade: Primary colors, 2nd Grade: Secondary colors, 3rd Grade: Tertiary colors, 4th Grade: Complementary colors and 5th Grade: Analagous colors.  We began by a guided drawing of our faces, step-by-step.  I gave the students a mirror to see the shapes of their features and the lines of their hair and to discuss proportion.  There were lots of giggles at first (mainly with the little ones), as I told them to look in the mirror and say, "Hi Beautiful!" or "Hi Handsome!"  And they actually did it!  I love that they were having fun with their reflections and giving themselves a positive affirmation!  I demonstrated how to draw the different textures and styles of hair and eyeglasses, as well as how to add accessories, like headbands, earrings, etc. Finally, we discussed the color scheme their grade level would learn about through this project and how to color in their faces and features using non-traditional colors.  It was difficult for some of them to wrap their heads around using an odd color for their skin and hair, but I explained to them that these were in a pop-art style of bold, bright, unexpected colors.  These were meant to be fun portraits, not so much a serious photo realistic type portrait.  It was mainly the older kids that had more of a difficulty with sticking to the color schemes, the younger ones didn't seem to question it.  They were instructed to fill in the space of the paper with lots of color and pattern.   When they had completed the portraits, I made them into banners for their class to display in the hall outside of their classroom.

Saturday, October 1, 2011

Positive/Negative Hands


All I can say is, "WOW!!!" This project is- hands down- one of my very favorites!  The pictures do not do the actual work justice.  We filled the 4th grade hall with these hands and it is a feast for the eyes!  We learned about positive and negative space and cool and warm color schemes.
We started by making a background for our hands using Mr. Sketch watercolor markers on a 12" x 18" piece of white sulphite drawing paper.  I separated containers of them by color schemes, and the students had to choose if they were a "cool" or "warm" color scheme person.  Most students chose cool colors.  As you can see by the last example, the students drew "bursts" of radiating colors in concentric lines all over their paper.  Then they painted over their paper with clear water making sure to go off the edges of the paper.  The effects were amazing!  Most papers lost the initial drawing of the lines as the water worked it's magic, blending and gradating the color.  The students then traced their hands on a 9" x 12" piece of black paper.  I instructed them to make a small cut from the edge of the paper to the tip of their thumb to "get into" their hand and then cut around the contour line.  This was just meant to reduce frustration for them.  When the papers were glued down to the background, the cut becomes practically invisible.  They used their same color scheme to color in their hands and frame of hand with Prismacolor pencils.  I told them they could write (appropriate) words if they would like, patterns and designs and to, most importantly, express themselves!  I am giving them a huge virtual clap of my hands for a job well done!

Saturday, September 17, 2011

A New Year, A New Room!


               I am late this year in beginning my blogging, so much has been going on that it has been difficult to get started.  I know that now that I have begun, watch out!  I will have tons of new posts this year and I am so excited to share with you what I'm doing with my students!
              This room (pictured above) has come to us at long last.  For the past few years I have taught art on a cart at this school.  With budget cuts in our district, we lost our pre-k 3 program, so it opened up some classrooms.  Fortunately, one of them was a multi-purpose room with a sink! And a range and a refrigerator!  An art teachers dream!  Since I teach at two schools, the same happened at my other school, and they asked me to move inside the building from my portable classroom.  I spent the month of August making both moves.  At the end of the first week, I found out that I would possibly have to move this classroom (pictured) down the hall to make room for a new bilingual kindergarten teacher, due to over enrollment in the bilingual kindergarten program and the space I am in is in the kinder section of the school.  The following week, I found out I would have to move my classroom at the other school back out to the portable, due again to unforeseen over enrollment.  After spending a day feeling completely overwhelmed at the prospect, the principal at this school told me I would not have to move this classroom after all!!!  Whooohooo!  Turns out we were under enrolled in English kindergarten classes and one of our teachers that had a small class would be going to another school and they would be combining classes and the new bilingual kinder teacher would go in her old room.  I was sooo relieved, but of course, sorry for the teachers having to switch schools, these changes are hard sometimes.  
               I still needed to move my room back out to the portable at my other school, and completed that last week in one day (don't ask me how, but my husband was AMAZING!!!).  I still need to organize it and decorate it, but it is moved, and that's all that matters right now.  I'm just so glad it was only one room that was moved!
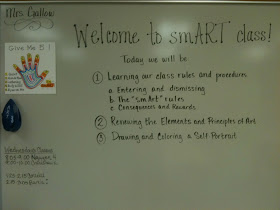
               As you can see by my pictures, this year my theme is "smART" class.  This has been the best classroom management/learning tool I have used so far.  It started with a seed idea to go with this "smART" theme and use it to define my classroom rules and as a reference to everything we do in art that makes us smarter; higher level thinking skills, problem solving, creativity and recycling.  I shared this idea with my facilitator who also thought it was a good idea, and from there we collaborated on how to implement it in our classrooms.  
               You will notice my smART theme is everywhere, from the sign on my door, to the display outside my classroom, to the rules on my board, to the Welcome sign in chalk that my daughter Sarah made for me.  When I welcomed my students to smART class for the first time, I explained to them what that meant; that everything we do in art WILL make us smarter, but only if we are making smart choices.  If we are not, we will not learn everything there is to learn this year in art and we will be making it more difficult for others to learn.  So, to be smart, we will...and I went over my rules (which you can see pictured above).  If they followed the rules during class (which everyone is EXPECTED to do), and maybe they went above and beyond by participating in class-answering questions, or asking questions, being observant, being helpful to a friend or encouraging, or helping to clean up extra well, then they may get chosen as one of my "smARTest Artists" for the day.  I choose two from every class and those students receive a bracelet that says, "I am a smART Artist!" on it.  I made the bracelets by first creating a paper with 1" sections divided by lines across the width of the paper and writing my phrase in each section.  Then I copied this on to colorful cardstock and laminated them.  Then I cut the strips to make the bracelets and I tape them onto the students wrists.  When I choose the two students in each class that have EARNED the bracelet for that day, I tell them exactly how they were being a smART artist and why they earned it.  The pride that they feel is so awesome to see.  If they receive a bracelet, they also get a slip of paper to put in their grade level container for a chance to win an art supply to take home.  I choose one student per grade level for each week I am there (for a total of 18 winners in each grade for the year).  I will never give the same students a smART artist bracelet twice, unless we have gone through all the students in the class and still have art classes left.  I tell them I want to give everyone a chance to show me what a smART artist they are.  Once their ticket goes in the container, it stays in there all year long (unless it is pulled), so they will get several chances for their ticket to be pulled.  The supplies I give away are ones that I received from the pre-k 3 teachers that cleaned out their classrooms when they left, other teachers donations at the end of last school year, free supplies I received from vendors, and homemade crayons (made by melting broken crayons in silicone brownie bite tray in oven).  
                The students LOVE the new art room, I have a huge increased participation in class, and they all want to earn these smART artist bracelets.  If I have to warn them about their behavior, I ask them to think about if they're making a smart choice.  I would NEVER tell them "you are not being smart".  That language is destructive to their self esteem.  I am very careful to show them I believe in them and I KNOW they are smart.  I want THEM to decide for themselves if their behavior is smart or not.  I remind them I have a lot to teach them and I need them to make the smart choices I know they are capable of making.  
                I look forward to sharing smART stories with you this year, and hope to hear from you!  Please leave a comment for me if you have any questions or suggestions!  We can all be smARTer teachers by sharing and blogging!