Search Creating Art

Saturday, May 21, 2011

3rd Grade Flowers in Vases


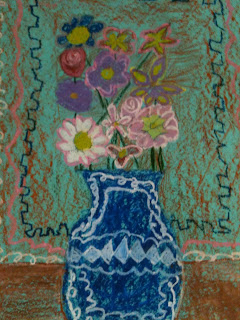
    3rd Graders took some very creative approaches to this project of drawing flowers in a vase.  I love doing a project like this one with my students because they have so many options and choices with the subject matter and the colors they use.  Oil pastels make these especially bright and colorful on colored construction paper.  I like the depth that starting out with a colored paper brings the art work.  The students have their choice of paper color, then we look at pictures of real flowers and discuss the different lines and shapes that make each flower look the way it does.  I demonstrate how to draw the vase on the paper by explaining that the vases take up almost all of the lower half of the paper, while the flowers take up the whole upper half...filling the space on the paper is very important.  I show them how they can begin with a line that will be top of their vase and line that will be the bottom.  They can draw any kind of line on the side of the vase, then make one that is reflective of that on the other side.  This can be the most difficult part for some students.  I tell them to be as creative as they would like with their vases!  We draw a horizon line that will indicate our table.  Then I demonstrate how to draw some of the different blooms on the flowers.  I tell them to use a variety of different blooms, in different shapes and sizes.  I explain that variety is one of the principles of design and it adds interest to their art work.  I tell the students to save their stems for last, and I show them how to draw a line from their bloom to the top of the vase, stopping and starting around other blooms to make them overlap.
    After they have completed their pencil drawing, it is time to color in their work with oil pastels.  I demonstrate how they can rub the oil pastels on their sides for coloring in large areas, and how to use the tip for smaller, detailed areas.  I show them how to blend colors together and how to add dimension to their flowers and vases.  The students really enjoy using the oil pastels, even though they can be so messy.  I always tell them to not rest their hands on their work, or wipe over their work with their hands, because the pastels will smear easily and make prints on their paper where they don't want them.  They can use paper towels to rest their hands on while coloring if they like.  Each picture is so uniquely the students' own vision and creative interpretation.  Choices are so important when teaching students art.  The more the better!  This builds confidence, self-esteem, and pride in one's own work.  It is wonderful, too, when students can compliment one another on how they did something different and what a good choice they made.  How affirming is that?!  When our peers can lift us up for making a unique choice and not going along with the crowd?  These are the real lessons we are learning in art.

Monday, May 16, 2011

1st Grade Bird Sculptures


    These adorable bird sculptures, made by adorable 1st graders, were so easy and fun to make!  We read a book about birds and then I demonstrated how to shape the body, head, beak and tail of the bird out of white model magic modeling clay (I colored the clay with watercolor markers and kneaded it to get the desired color of my bird).  Then I showed the students how to press the eyes into the clay, add the feathers and shape the feet using pipe cleaners (each leg is 1/4 of a pipe cleaner), sticking the legs up into the bottom of the bird.  Last, I hot glued their feathered friends onto small squares of black railroad board.  Each one had a different personality, just like their creators!  

Saturday, May 14, 2011

1st Grade Seahorses


    My first grade students made these beautiful seahorses after we read the book"Mr. Seahorse" by Eric Carle.  While Eric Carle uses painted papers to collage his pictures, we simply drew ours and colored them in with crayons.  I gave the students a variety of different kinds of crayons; glitter, metallic, construction and regular to color their creatures with.  Last, we sprayed them with watercolor spray in Nancy Bottles.  They look like they're floating in a colorful sea and the kids were wowed by the spray.  This was a one part project, including reading the book.  The kids loved their seahorses and everyone was amazed at how beautiful they turned out!

Monday, May 9, 2011

4th Grade Winter Trees


    I know I am posting this past winter (at least it is way past it here in Texas!), but, in some parts of the world, this may still be relevant.  I wanted to do a poetry/art lesson with my fourth grade students this year, one that tied together nature poetry about winter and and a winter landscape painting.  So, I chose a poem by a favorite American naturalist poet, Robert Frost, entitled "Stopping by Woods on a Snowy Evening".  I found a website that has recordings and animated videos of poems, so we listened to the illustrated poem to begin our lesson.  We discussed the poem and the way it made us feel and what we visualized as we were listening.   Then we sketched winter trees, to get a feeling for what a tree looks like with bare branches.
    Next, we made a watercolor background with a blue wash and salt technique that gave it an effect of a snowy winter sky/ground.  The next art class we had, we painted our trees on top of our background with black ink.  I instructed the students to make horizontal strokes of the brush across the ground and not to paint it all in, the effect was a snowy ground with shadows.  Perspective was used in painting the trees, first larger at the foreground then gradually getting smaller as they became closer to the horizon line.  These paintings turned out beautiful.  Robert Frost would be proud!

Sunday, May 8, 2011

5th Grade Monochromatic Paintings


5th graders learned about how to mix tints and shades, made freeform lines that intersected and added a closed shape over those intersecting lines.  That shape then will become the point of emphasis.  Students can choose to either make the shape in all tints and the rest of the painting all shades, or vice/versa.  We looked at Picasso's Rose Period and Blue Period for a fine art reference, depending on what color I had chosen to focus on for that class.  It was a good exercise in mixing paints and thinking about emphasis in art.  The students enjoyed the mixing and painting and the results are striking!

Wednesday, May 4, 2011

1st Grade Paper Sculptures


     Students love making paper sculptures!  They thoroughly enjoy cutting, folding, bending, twisting, tearing and gluing paper.  Paper sculptures are one of my favorite projects to do with my younger students.  It is not intimidating to work with paper, like say, it is to try and draw a person or an animal.  You can't make any mistakes here, really.  It is just freeform imagination at its best!  Plus, you get to put to use all of those scraps of paper you've been saving all year long.  
    There are so many different ways to make a paper sculpture, this is only one.  It is abstract and fun!  First, I begin with showing students a Power Point on Sculpture.  This familiarizes them with the terms and concepts involved in making 3D art.   Then, we make a base for our sculpture by folding a 12" x 18" piece of paper into 4 th's, that the students have colored lines, shapes and designs on with crayons.  Glue the two ends of the paper together as they overlap, to make a tall, triangular base for your sculpture.  You can cut out notches in the sides to invert for an interesting design on the edges.  Last, show the students all the different ways they can manipulate the paper by folding and cutting and tearing and twisting.  Students can glue each piece onto their base in any way they want.  The results are so much fun and it is an hour well spent in the life of a child!