Search Creating Art

Wednesday, December 29, 2010

Four Seasons Prints and Collages


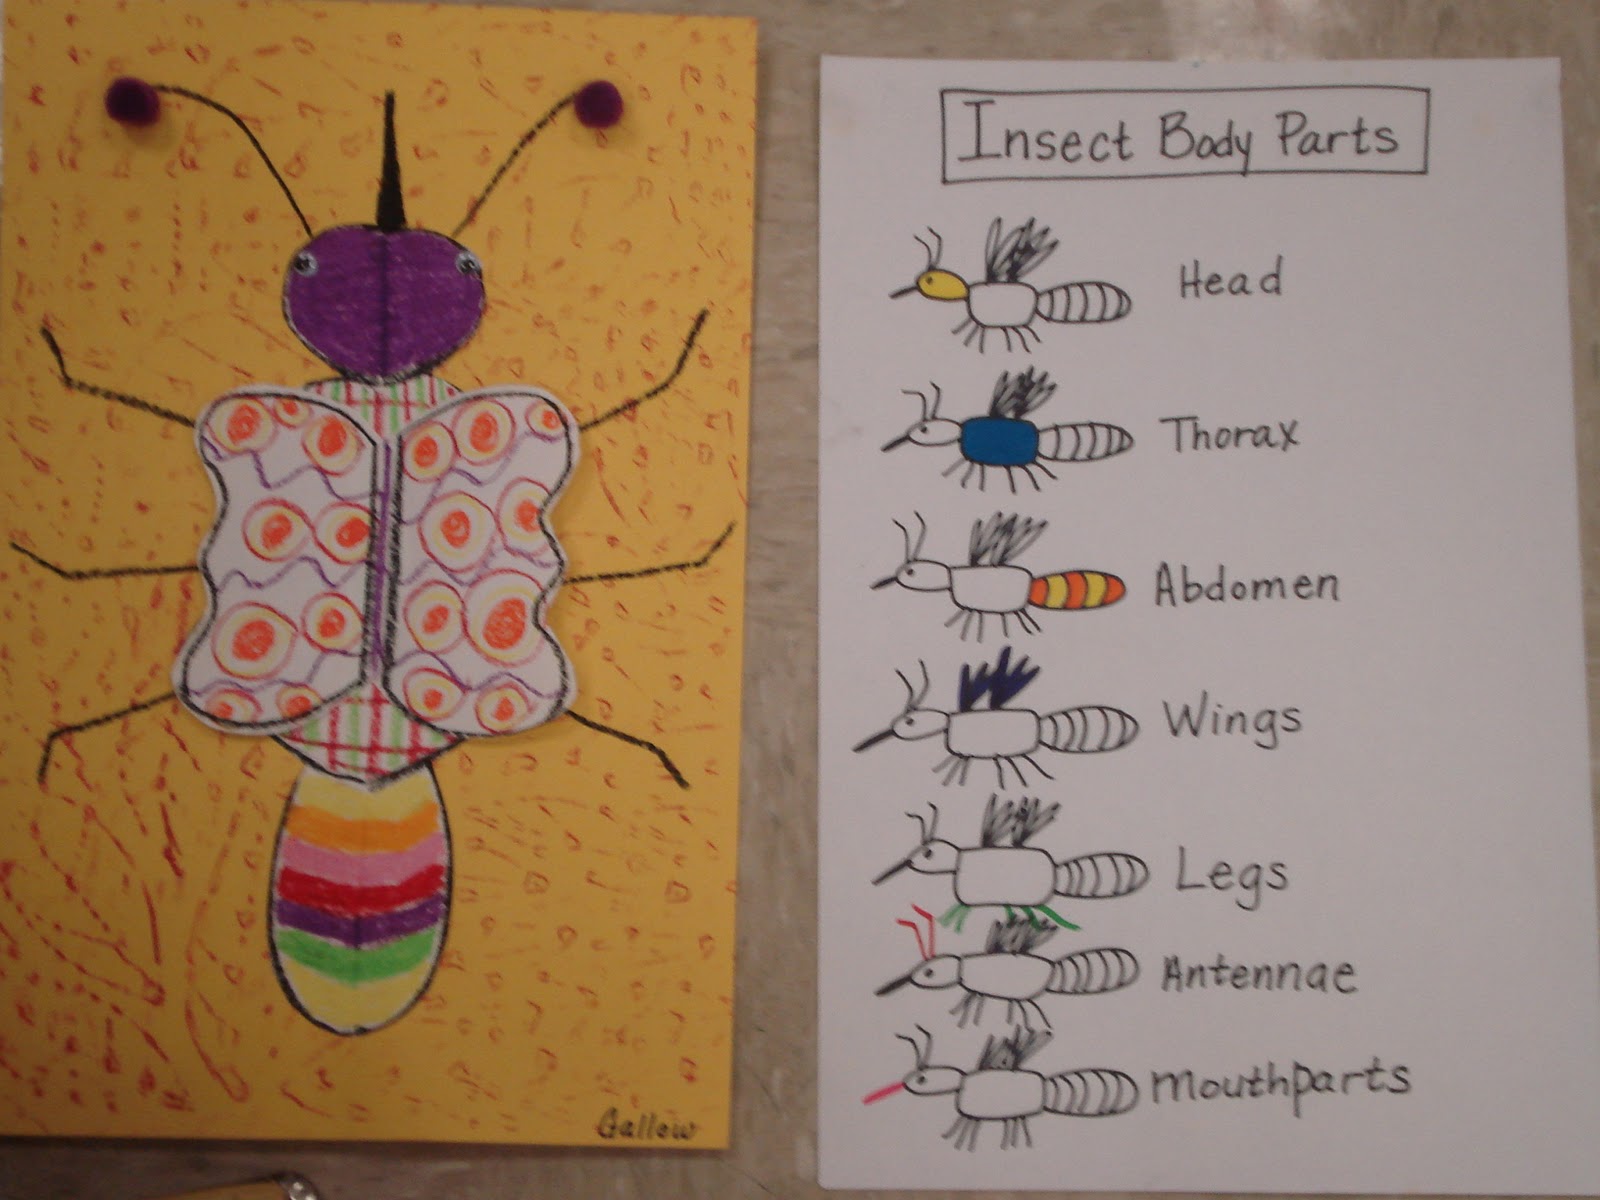
    This was a lesson that could be done with many different themes, but for second graders that were learning about the seasons, it not only helped reinforce what they were learning in science and writing, but, it helped them to think about color (warm and cool families), taught them about the printmaking process, and showed them how they could add dimensionality to their art with collage.  
    To begin, I read them a book about the seasons and we discussed the adjectives that described each one.  What did each season make us think of?  How does each one feel?  Look? What colors do we see?  Then we talked about a tree, and how a tree looks different in each season.  We discussed how to draw a tree with bare branches and what lines we would use.  The students practiced drawing a tree on scrap paper first, because I explained that once they pressed their pencils into the foam board, their drawing could not be erased.  Each mark would show up in their print.  
    After doing a quick practice sketch, I gave each student a 4" x 6" piece of foam board and instructed them to draw their tree in the middle, being sure to use their space wisely, not drawing it too small.  I told them to add a horizon line to their drawing, as well.  Once they had made their tree drawing, it was time to print them on their paper.  For each second grade class, we tried printing different colored inks on different colors of construction paper, so that we wouldn't have 5 classes with the same exact looking project.  I set up a printing station in each classroom (this is the school where I teach art from a cart), and I called the students up by tables.  They would bring their colored construction paper with their name on the back, and their tree drawing.  I would ink their drawings, and they would roll the brayer over the back of the drawings to make the four prints.  I found this was the most efficient way of doing this part of the project, but it was very time consuming, taking the whole class period to finish.  
    Once the prints were complete, they were set aside to dry until the next art class.  During our next art class, the students were shown how to collage leaves and snow onto their trees and the ground areas of their pictures.  We tried different collage materials or media in each class to make our leaves and snow.  One class painted theirs on with q-tips dipped in tempera, two classes used felt, one class used small pieces of wadded up tissue paper and one used colored construction paper pieces.  Each had nice results, but I think the most visually interesting projects were done with either the tissue paper or the felt.  
    After the students completed the collage part of their project, they were instructed to write about the seasons using the adjectives that we had talked about.  They wrote around the perimeter of their picture quad in pencil, then they traced over their writing with fine point sharpie markers and erased the pencil underneath.  The bilingual classes wrote in Spanish and some students chose to write rhyming sentences that read like a poem.  The students were very proud of their work and received many compliments from admirers.  Their art was just gorgeous on display throughout the hall!

Paper Sculptures


    Kindergartners made these beautiful paper sculptures using construction paper scraps and a lot of creativity!  Learning about shapes is basic to art and to math, and is something that kindergarten students are very familiar with.  Even geometric shapes are being taught at this grade level- cubes, prisms, etc.  The students have seen the shapes and even held them in their hands with models in their classrooms, built with them, done puzzles with them, cut them out of handouts, but, most have not constructed them with their own hands.  The students absolutely loved making circles, ovals, spirals, squares, arches, zig zags, overlapping and interconnected shapes, and even shapes that have no name!  As they cut, twisted, folded and glued, you could just see the wheels spinning in their heads!  One student told his classroom teacher in a soft voice, "I'm so excited".  She asked, "About what?"  He pointed to his art work and said, "About this".  He perfectly described the feeling in the room... one of excitement and joy as each child was discovering what they could create with their minds and their hands.  He perfectly described in his quiet little way, why I do art and why I am an art teacher.  When I see what I can make with my mind and my hands, when I see what my students can make, I feel so excited... oh, the possibilities!  If I can do this, what more can I do?!!!  Let's find out together...

Character Puppets


 This project was a great way to incorporate writing with art!  3rd grade students designed puppets and wrote a short story about the characters they created.  Before we began, I read them a story with beautifully detailed pictures and descriptions of the main characters.  We talked about how the students could think about a character they would want to create- What would it look like?  Would it be an animal, a person, an alien, etc....?  Where would it live?  How old would it be?  Would it have a job?  What kind of adventure could they dream up for their character?
    After brainstorming ideas for our puppets, we began with creating the head of the puppet using about a golf ball size amount of Model Magic that we attached to the end of a handle we made by rolling up the long side of  a 9" x 12" piece of construction paper and gluing it closed.  I demonstrated ways the students could mold the clay to make the facial features and hair, by either pulling out the clay from the piece or adding to it.  Once they completed their heads, they were set aside to dry until the next art class, when they would paint them and add other details like google eyes if they liked.
While the heads were drying, the students could work on decorating a paper bag that would be their puppets' body.  We used metallic and Gel FX markers that showed up well on the brown paper bags.  In our next art class, the students added arms and legs using either construction paper or paper bag scraps.  We cut a hole in the top of the bag (which is actually the bottom of the bag) and inserted our handle with the head in the hole.  When the bag was opened up, the students could put their hands up inside of the bag and hold the handle to play with their puppets.  Once the puppets were assembled, the students wrote the short stories about their characters and pasted them on the back of the bags with a glue stick.  It was so much fun when the students shared their puppets and their stories with the class!  This was a project that really tapped into their creative thinking and it showed in the results- their puppets were fantastic to look at and their stories were imaginative and humorous.  Sharing their art work and their stories was also a part of our learning with this lesson- the students were reminded about how to be a good audience member and be respectful of each others feelings.  Only positive comments were allowed.    It was great to see how the students were so encouraging with one another and found ways to compliment each others work.  This project was definitely a big hit!

Monday, November 8, 2010

Wind Spinners


    We read the book "Like A Windy Day" in first grade art class today.  Their teacher and I both told funny stories about times when the wind took things out of our hands and blew them far away, sending us on a wild goose chase to get them back!  I asked them if they remembered the scene in The Polar Express when the little girls' golden ticket got lost and was swept away by the wind- they finished the story.  I asked them to tell me what can be blown away by the wind and what can't.  They understood that the wind moves things and can sometimes be very powerful.  Then, we made Wind Spinners; our very own art that can be twisted and turned in the wind.  This was a one part lesson, and the students loved making these. They were so excited to be able to take them home and share them with their families.


Kindergarten Miro's

Kindergarteners learned about the art of Joan Miro.  His work lends itself so well to elementary art and children seem to really respond to Miro's style.  We talked about the way Miro used symbols instead of making his work look "real".  Each student saw something different in his work, but, to my surprise, there was always one student in each class who thought the above picture looked like a bumble bee!  I gave each of them a sheet of 12" x 18" tan construction paper and a big, fat, black crayon.  I told them to stretch their arms out so that their drawing hands rested at the top of their papers.  Then, with their eyes closed, to draw a big circle.  I didn't want them to look at their papers, because it seems when they do, they think so hard about making the "perfect" circle, their circles come out tight and small.  I wanted them to be very organic shapes, like Miro's.  Next, they were instructed to draw a shape for their body and then add arms and legs- as many as they wanted.  Some students did more than one figure on their paper.  We observed the various lines and shapes Miro made in his work, and I instructed the students to decorate their papers with these symbols, or to make up their own.  Students then painted inside their figures with black tempera paint.  In our next art class, students added details on top of their figures with white crayons, and further embellished their art work with chalk pastels and a few spritz's of watercolor spray.  I told the students I thought Miro was smiling on us and that he would be really proud of their work!


Wednesday, October 27, 2010

Fall Leaf Watercolors

After collecting leaves of various shapes and sizes from the school grounds, I discussed with my first grade art students why leaves change colors and fall off the trees in the fall.  I used the example of the tree being a mama who grows weary and tired when winter nears.  She needs to rest- she has been working hard all year to feed and nourish all her baby leaves.  So, being like most mamas who need to rest, she shakes her babies from her limbs and tells them that they need to get off her, she needs some time to rest.  I asked the students if their mamas ever said that to them, and the answer was a resounding "YES!"  The analogy just came to me when I started talking about the leaves, because like most things in my life, I relate to my parenthood.  I told the students that after the mama starts to rest and can't feed her babies anymore, making them green, that's when the colors that were always in them begin to appear.  We talked about how water, sun and chlorophyll all play their part in making the leaves green.  The art lesson began with science, and ended with coloring and painting.
Placing the leaves underneath their watercolor paper, the students used rubbing crayons to rub on top of the paper and make their leaves appear- this never fails to make them "Ooooh and Ahhhh!"  It's like magic!  Then, using a warm color palette, the students painted in their leaves with watercolors and washed their backgrounds with cool colors.  This was a one part lesson with beautiful results.

Monday, October 25, 2010

Martha Graham to Agnes de Mille...

"There is a vitality, a lifeforce, an energy, a quickening that is translated through you into action, and because there is only one of you in all of time, this expression is unique.  And if you block it, it will never exist through any other medium and it will be lost.  The world will not have it.  It is your business to keep it yours clearly and directly, to keep the channel open.  You do not even have to believe in yourself or your work.  You have to keep yourself open and aware of the urges that motivate you.  Keep the channel open... No artist is pleased (there is) no satisfaction what(so)ever at any time.  There is only a queer divine dissatisfaction, a blessed unrest that keeps us marching and makes us more alive than the others."

Thursday, October 21, 2010

GIANT CROCS!


2nd grade students created these Giant Crocs!  Elementary age students (I can only speak for them) have a very hard time drawing BIG.  This project was the perfect subject to teach them how to draw on a large scale- I told them, "I don't wanna see any itty bitty little crocodiles!  Crocodiles are BIG!  So fill up your whole paper!" 
We watched a Power Point presentation I created on crocodiles, with lots of pictures and factual information.  We discussed the texture of the crocodiles skin and the lines we would use to draw the crocs. 
Then, using a large piece of green craft paper, we drew them step-by-step.  Once they were drawn in pencil, students outlined them in black permanent marker.  Next, we added texture to the crocodiles skin by using rubbing crayons and texture cards.  Students colored in the teeth and eyeballs with white crayons and cut their crocs out.
The final step was to make an environment for our crocodiles.  We learned that they live in the water and find their prey on the banks of the water.  So, on a large piece of cardboard, approx. 12" x 28", we collaged water and a sandy bank.  This was the most fun project!  The students liked making our BIG art project and they named all of their crocs! 


Friday, October 15, 2010

Symmetrical Insects

Teacher Example

First graders learned about insects and their body parts in art.  We talked about how an insects body is the same on both sides and the word for that is symmetry.  Then we drew half of our insects' body on a long, folded sheet of paper along the creased edge.  The students traced their pencil lines with black crayon and folded the blank side of their paper on top of their drawing.  They printed their black lines on the other side of their paper by rubbing over their folded paper with a craft stick.  Students then traced over their printed lines again with black crayon.  Now they were ready to decorate their insects with bright, colorful patterns!  They colored in the head, thorax and abdomen, then cut out their insects' body.  Each student made a decorated paper to glue their insects on, drew in the antennae, mouthparts and legs, created wings and glued them on, and added googly eyes and pom poms to end of their antennaes for the final touch.  The students had so much fun creating their insects!  They did a fantastic job! Here are some examples:


Thursday, October 14, 2010

Optical Illusions


Fifth graders learned about Optical Illusions.  We created these simple designs, by dividing our paper into eight sections and drawing lines that curved in opposite directions in each section.  Students then created a color pattern within their "stripes" and shaded the outside edges of their stripes, to create the illusion of the sections curving outward.

Radial Designs

Fourth Graders learned about radial designs- any type of balanced design based on a circle.  We looked at rose windows and mandalas for inspiration, learning about this ancient art form.  To make their own radial designs, we used a printing technique which made it easier for the student s to create a balanced design.
First, we created a section of the circle by folding a 6" square on the diagonal and cutting off the top of the paper, through both layers, to create a "pizza wedge".  Then, on one side of the pizza wedge, students drew simple lines and shapes to create a design.  They traced their design with an oil pastel, folded the other side of the pizza wedge on top of their drawing, and printed it onto both sides of the paper.  They traced over the printed design again with the oil pastel.  Once they were ready to print the design onto a larger piece of paper, the students werte given a 12" square of white drawing paper and folded it in half twice.  This made a vertical and a horizontal line going throught the center of the paper which they would use as their guide for printing their design.  They placed their design wedge, pastel side down, onto their paper and transfered onto the paper using the side of a large craft stick.  Students then rotated their design around the center axis, printing in all four sections of the paper.  Once their design was completely printed onto their large paper, they traced it with a black sharpie, colored it in with crayons and went on top of their crayon work with watercolor markers.  The result were beautiful, stained glass looking radial designs.