Search Creating Art
Showing posts with label 3rd Grade. Show all posts
Showing posts with label 3rd Grade. Show all posts
Saturday, May 21, 2011
3rd Grade Flowers in Vases
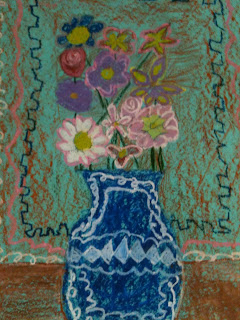
3rd Graders took some very creative approaches to this project of drawing flowers in a vase. I love doing a project like this one with my students because they have so many options and choices with the subject matter and the colors they use. Oil pastels make these especially bright and colorful on colored construction paper. I like the depth that starting out with a colored paper brings the art work. The students have their choice of paper color, then we look at pictures of real flowers and discuss the different lines and shapes that make each flower look the way it does. I demonstrate how to draw the vase on the paper by explaining that the vases take up almost all of the lower half of the paper, while the flowers take up the whole upper half...filling the space on the paper is very important. I show them how they can begin with a line that will be top of their vase and line that will be the bottom. They can draw any kind of line on the side of the vase, then make one that is reflective of that on the other side. This can be the most difficult part for some students. I tell them to be as creative as they would like with their vases! We draw a horizon line that will indicate our table. Then I demonstrate how to draw some of the different blooms on the flowers. I tell them to use a variety of different blooms, in different shapes and sizes. I explain that variety is one of the principles of design and it adds interest to their art work. I tell the students to save their stems for last, and I show them how to draw a line from their bloom to the top of the vase, stopping and starting around other blooms to make them overlap.
After they have completed their pencil drawing, it is time to color in their work with oil pastels. I demonstrate how they can rub the oil pastels on their sides for coloring in large areas, and how to use the tip for smaller, detailed areas. I show them how to blend colors together and how to add dimension to their flowers and vases. The students really enjoy using the oil pastels, even though they can be so messy. I always tell them to not rest their hands on their work, or wipe over their work with their hands, because the pastels will smear easily and make prints on their paper where they don't want them. They can use paper towels to rest their hands on while coloring if they like. Each picture is so uniquely the students' own vision and creative interpretation. Choices are so important when teaching students art. The more the better! This builds confidence, self-esteem, and pride in one's own work. It is wonderful, too, when students can compliment one another on how they did something different and what a good choice they made. How affirming is that?! When our peers can lift us up for making a unique choice and not going along with the crowd? These are the real lessons we are learning in art.
Tuesday, February 1, 2011
String Prints on Painted Paper
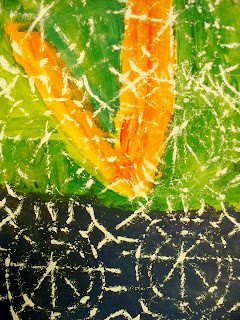
3rd Grade students created these sophisticated prints on painted paper. Wanting to introduce printmaking to them, I thought an easy way would be by making relief prints from plate cards made with foam core and string glued on top in an abstract, linear design. I love the look of prints made on painted paper, so I first had the students created their papers. We began with primary colors, as I showed the students how to mix them to create secondary colors, then choose which colors they would like to paint on their papers. I discouraged them from mixing their colors on their paper (so as to avoid muddy results), but instead, beginning with their lightest color and creating an interesting shape or stroke of the paint they liked, then laying a new shape or stroke with the next darkest color next to it, and building their painting in that way.
Once their paintings were complete, I showed them how to create a simple, abstract line drawing on a 6" square piece of paper. Their only instructions were to use their space in an interesting way (i.e.; not leaving one side of the square blank and not making too small of shapes), and to not draw too much detail, as this would be difficult for them to cover exactly with yarn. After they made drawings that were satisfactory to them, they transferred them onto a 6" square piece of foam core. Using glue to trace over the lines and yarn to lay down on top of their glue, they created their string printing plate cards.
During the next art class, after their papers and plates had plenty of time to dry, the students were ready to create their prints. The idea was to make multiple prints on their 9" x 12" paper. They chose either white or black ink to make their print with, rolled onto their plate with their brayers, then placed them first in the corner of their papers, rubbed them well, and made their first print. The following prints just lined up on the paper one right after the other until the entire surface was covered.
The students enjoyed the printmaking process very much and have asked me when they can make more prints. Ahhh, there are always too many things to create and too little time!
Saturday, January 22, 2011
Painted Paper Weavings
2nd and 3rd graders made weavings from papers that they had painted using watercolor and tempera paste. This is a beautiful version of the traditional weaving projects we do with colored construction paper in elementary school.
With the watercolor project, I had the students create two paintings; one warm color (yellow, orange and red) and one cool color (green, blue and purple). Starting with our warm color scheme, we looked at the color wheel and I told the students we would begin with our lightest color first, making a dot or a line (or 2 or 3 of them) on their watercolor paper with the yellow paint. They would then need to paint concentric circles or lines around their original ones with the orange, and then the red. Then they would repeat the pattern until they had filled their whole paper (9" x 12") with color. The students then repeated the same process using the cool colors on a new sheet of watercolor paper. In our second art class, we then wove the papers together for beautiful results!
For the tempera paste painted papers, I used a mixture of 1/2 tempera paint to 1/2 art paste to make the tempera paste. Using donated construction paper (the lesser quality kind than we normally use in the art room), students chose either the warm or cool color schemes to paint with the paste paint, then scraped and stamped designs and patterns into their paper using forks, thread spools, cardboard scrapers, popsicle sticks, and other objects (a la Eric Carle). The second art class we wove the wonderful papers they created together and the students loved the way they looked!
Wednesday, December 29, 2010
Character Puppets
 This project was a great way to incorporate writing with art! 3rd grade students designed puppets and wrote a short story about the characters they created. Before we began, I read them a story with beautifully detailed pictures and descriptions of the main characters. We talked about how the students could think about a character they would want to create- What would it look like? Would it be an animal, a person, an alien, etc....? Where would it live? How old would it be? Would it have a job? What kind of adventure could they dream up for their character?
 After brainstorming ideas for our puppets, we began with creating the head of the puppet using about a golf ball size amount of Model Magic that we attached to the end of a handle we made by rolling up the long side of a 9" x 12" piece of construction paper and gluing it closed. I demonstrated ways the students could mold the clay to make the facial features and hair, by either pulling out the clay from the piece or adding to it. Once they completed their heads, they were set aside to dry until the next art class, when they would paint them and add other details like google eyes if they liked.
While the heads were drying, the students could work on decorating a paper bag that would be their puppets' body. We used metallic and Gel FX markers that showed up well on the brown paper bags. In our next art class, the students added arms and legs using either construction paper or paper bag scraps. We cut a hole in the top of the bag (which is actually the bottom of the bag) and inserted our handle with the head in the hole. When the bag was opened up, the students could put their hands up inside of the bag and hold the handle to play with their puppets. Once the puppets were assembled, the students wrote the short stories about their characters and pasted them on the back of the bags with a glue stick. It was so much fun when the students shared their puppets and their stories with the class! This was a project that really tapped into their creative thinking and it showed in the results- their puppets were fantastic to look at and their stories were imaginative and humorous. Sharing their art work and their stories was also a part of our learning with this lesson- the students were reminded about how to be a good audience member and be respectful of each others feelings. Only positive comments were allowed. It was great to see how the students were so encouraging with one another and found ways to compliment each others work. This project was definitely a big hit!
Thursday, October 14, 2010
Nature Weavings
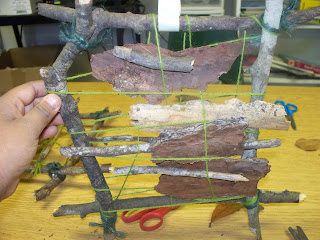
My third grade students made these beautiful nature weavings. It has been beautiful weather here the last couple of weeks, a perfect time to take our art outdoors! First, we made a frame out of sticks, hotgluing the sticks in place. The corners were then reinforced with twine. Then, the students created their loom by wrapping yarn around their frame vertically and horizontally. Once their loom was made, we went outside and collected natural objects for our weaving. The weaving pictured above makes me smile huge when I see it; the student proclaimed after placing the yellow leaf in it, "Look! The yellow leaf gave it spirit!"
Labels:
3rd Grade,
Nature Weavings,
Recyclable Art,
Weavings
Subscribe to:
Posts (Atom)


