Search Creating Art

Showing posts with label Oil Pastels. Show all posts

Sunday, October 30, 2011

Variations on a Theme


      Pumpkins, Squash and Gourds!  When Fall arrived here in Texas, the only way we knew it was from the displays in the stores.  The trees did not turn, and it is only now getting cool out.  With the long drought we have had to suffer through and the 100+ days of 100+ temperatures, I was ready to usher in Fall!  By far my favorite season for the colors, the smells, the tastes, the temperature and the clothing!  It was time to bring Fall into the art room.  
     I purchased a large pumpkin and a bag of smaller squash and gourds.  A teacher friend, Judi, donated a bag of small pumpkins.  The students were amazed at the sight of the huge pumpkin and the tiny ones, the unusual textures of the squash and gourds.  I passed them around the room for the students to feel and describe before they would draw them.  Then I set them all up on a rolling cart in a still life with a beautiful complementary blue cloth below them.  We discussed the shapes, sizes lines and textures in the still life.  Proportion, overlapping and perspective were also discussed.
    K, 1st, 2nd and 5th grades all drew still lifes in different medias using different elements and principles of art.  Above I've shown three examples; a 5th grade value drawing, a 2nd grade oil pastel drawing and a 1st grade painted paper collage.  The painted paper collage idea I got from the wonderful Deep Space Sparkle sight.  This project was a big hit with beautiful results!  
    If you have any questions about how we went about these lessons, please message me and I'll be happy to share in more detail.  Happy Fall Y'all!!! 

Saturday, May 21, 2011

3rd Grade Flowers in Vases


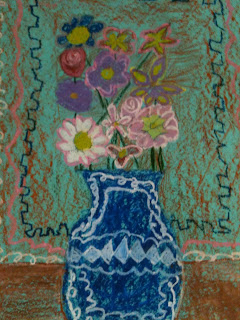
    3rd Graders took some very creative approaches to this project of drawing flowers in a vase.  I love doing a project like this one with my students because they have so many options and choices with the subject matter and the colors they use.  Oil pastels make these especially bright and colorful on colored construction paper.  I like the depth that starting out with a colored paper brings the art work.  The students have their choice of paper color, then we look at pictures of real flowers and discuss the different lines and shapes that make each flower look the way it does.  I demonstrate how to draw the vase on the paper by explaining that the vases take up almost all of the lower half of the paper, while the flowers take up the whole upper half...filling the space on the paper is very important.  I show them how they can begin with a line that will be top of their vase and line that will be the bottom.  They can draw any kind of line on the side of the vase, then make one that is reflective of that on the other side.  This can be the most difficult part for some students.  I tell them to be as creative as they would like with their vases!  We draw a horizon line that will indicate our table.  Then I demonstrate how to draw some of the different blooms on the flowers.  I tell them to use a variety of different blooms, in different shapes and sizes.  I explain that variety is one of the principles of design and it adds interest to their art work.  I tell the students to save their stems for last, and I show them how to draw a line from their bloom to the top of the vase, stopping and starting around other blooms to make them overlap.
    After they have completed their pencil drawing, it is time to color in their work with oil pastels.  I demonstrate how they can rub the oil pastels on their sides for coloring in large areas, and how to use the tip for smaller, detailed areas.  I show them how to blend colors together and how to add dimension to their flowers and vases.  The students really enjoy using the oil pastels, even though they can be so messy.  I always tell them to not rest their hands on their work, or wipe over their work with their hands, because the pastels will smear easily and make prints on their paper where they don't want them.  They can use paper towels to rest their hands on while coloring if they like.  Each picture is so uniquely the students' own vision and creative interpretation.  Choices are so important when teaching students art.  The more the better!  This builds confidence, self-esteem, and pride in one's own work.  It is wonderful, too, when students can compliment one another on how they did something different and what a good choice they made.  How affirming is that?!  When our peers can lift us up for making a unique choice and not going along with the crowd?  These are the real lessons we are learning in art.

Tuesday, April 19, 2011

First Grade Starry Nights


    Well, first let me start off by admitting something about this project...it did not start off as a Starry Night lesson.  Originally, it was going to be a Snowy Mountain Cool Collage.  We created them before the holidays, when it was cold, then I went away for 9 weeks to the other school I teach at and we had to put it on hold.  When I returned, it wasn't cold anymore, so it felt a little funny making snow pictures.  But, true to my plan, I had a first grade class sponge snow over their cool mountain collages.  I was definitely non-plussed with the results!  I felt that the collages were so nice, but yet still needed something to complete them and decided to hold onto them until I figured it out.  Meanwhile, we went on to a new project.  When that project was finished, I was looking in an art book at Van Gogh's Starry Night, and had a light bulb moment- we'll use oil pastels on top of our landscapes to create our own Starry Nights!  I really love the results.  First graders enjoyed making the swirly broken lines just like Van Gogh, and  added their own ideas... the results are beautiful-just like them!   


Friday, April 15, 2011

Oil Pastel Dogs Inspired by George Rodrigue's "Blue Dog" Series


4th graders learned about the legend of Blue Dog and how artist George Rodrigue came to paint this subject over and over again.  We looked at some of his paintings and read a short bio on him.  Then students followed along as I demonstrated how to draw the contour line of their dogs.  Once their lines were drawn, students traced over them with a black permanent marker.  They could choose to color in their dogs with any color, but whatever color they chose (be it warm or cool), they were instructed to choose the opposite color family for their background.  Some students veered from those instructions, but the ones that followed them had eye-popping results.  All of their dogs turned out gorgeous and they had so much fun using the oil pastels and creating their unusually bright and colorful canines!


Saturday, September 25, 2010

Mexican Folk Art

     Last October, we studied the Folk Art of Mexico.  Los Dias de los Muertos (The Days of the Dead) is traditionally celebrated on Nov. 1st (All Saints Day) and 2nd (All Soul's Day) in Mexico.  Family and friends gather to pray for and remember their lost loved ones.  Private alters (ofrendas) are built to honor the deceased using items like pictures of their loved ones, candles, marigolds, the favorite foods and beverages of the departed, and most popular, sugar skulls.  
    Leading up to the Day of the Dead, students at all levels learned about the folk art associated with this holiday and other types of Mexican folk art, as well.  When the art projects were completed, we made a beautiful art display in the main hallway of our school.

    Kindergarten contributed decorated cones filled with tissue paper flowers to hang on the walls and brightly colored lanterns to line the hall. 
    1st grade painted brightly vivid Zapotec Rainbow Blankets to hang from the ceiling.  They were a cooperative learning project, for which each student was responsible for creating rhea knots along the edges of the blanket for the fringe, and a specific color of stripe in the blanket.  They created a pattern with their colors, waiting to take their turns, encouraging each other and problem solving along the way. 


    2nd grade painted this gorgeous flower mural; each class contributing a different layer to it in another cooperative learning effort.  One class made the initial drawings of the flowers in oil pastel, another painted them in with tempera, another added more details with oil pastels, such as insects, butterflies and veins in the leaves, and the last class added more paint. This project was found on the Painted Paper blog.  It was a wonderful success and added so much to our display.
    3rd grade learned about the art of Mexican folk art of metal tooling.  Embossing designs like suns, maracas, parrots, flowers, birds and lizards on the surface of the metal, the students then colored them in with brightly colored permanent markers.  I found this project on the Kinder Art website.  Each classes' projects were made into long connected hangings with beads on the top and bottom.  These were one of the favorite parts of our display!
    4th grade watched a video on Dias de los Muertos, which highlighted the making of sugar skulls and the bright, ornate decorations that adorn them.  Oil pastel "portraits" of sugar skulls were drawn and decorated with flowers and fun patterned backgrounds to add to their whimsy.  In Mexico, during Dias de los Muertos, there is a spirit of poking fun at the dead and honoring their lives with laughter and joy.  Our sugar skulls definitely put a smile on all our faces!
    Finally, 5th grade learned about the skeleton, making these wonderful reliefs out of art straws called "Funny Bones".  Skeletons (calaveras) are seen everywhere in Mexico during this time of year, dressed in all kinds of costumes or clothing; it is tradition to dress the calaveras up just as the departed loved ones they are honoring dressed.  We thought about someone we might want to honor and how they would have dressed.  One student made a military uniform in honor of her deceased grandfather, another made a flower printed dress in memory of her grandmother.  Most made clothing that represented their own ideas of how they wanted their skeleton to look; like a skateboarder or a rock star.  They embellished their art with yarn for hair, sequins and buttons on the clothes, and even beads for the skateboard wheels.  Skeletons were shown in motion; dancing, skateboarding, rocking out.  We discussed how the parts of our body would realistically move into different positions.  

    This unit was a wonderful way to tie in social studies and health science to our curriculum and brought so much cultural and community pride to our school.  We looked at the areas of Mexico we were studying on our world map, often making personal connections to the places and people who lived there.  We discussed the traditions and beliefs of our neighbors to the southwest of us, and learned about the art history and processes used to create the art in another country.  We found similarities and differences in all of these areas as we immersed ourselves in the rich art and historical traditions of Mexico.  Most of all, we discovered a real spirit of cooperation and team work in the art room.  This is what community is all about!