Search Creating Art

Showing posts with label 1st Grade. Show all posts

Sunday, October 30, 2011

Variations on a Theme


      Pumpkins, Squash and Gourds!  When Fall arrived here in Texas, the only way we knew it was from the displays in the stores.  The trees did not turn, and it is only now getting cool out.  With the long drought we have had to suffer through and the 100+ days of 100+ temperatures, I was ready to usher in Fall!  By far my favorite season for the colors, the smells, the tastes, the temperature and the clothing!  It was time to bring Fall into the art room.  
     I purchased a large pumpkin and a bag of smaller squash and gourds.  A teacher friend, Judi, donated a bag of small pumpkins.  The students were amazed at the sight of the huge pumpkin and the tiny ones, the unusual textures of the squash and gourds.  I passed them around the room for the students to feel and describe before they would draw them.  Then I set them all up on a rolling cart in a still life with a beautiful complementary blue cloth below them.  We discussed the shapes, sizes lines and textures in the still life.  Proportion, overlapping and perspective were also discussed.
    K, 1st, 2nd and 5th grades all drew still lifes in different medias using different elements and principles of art.  Above I've shown three examples; a 5th grade value drawing, a 2nd grade oil pastel drawing and a 1st grade painted paper collage.  The painted paper collage idea I got from the wonderful Deep Space Sparkle sight.  This project was a big hit with beautiful results!  
    If you have any questions about how we went about these lessons, please message me and I'll be happy to share in more detail.  Happy Fall Y'all!!! 

Monday, May 16, 2011

1st Grade Bird Sculptures


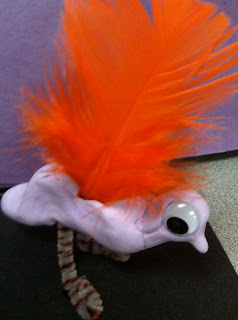
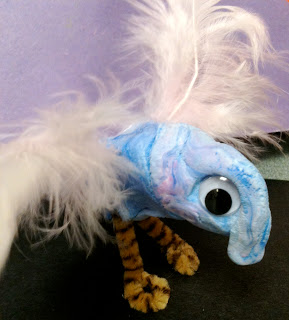
    These adorable bird sculptures, made by adorable 1st graders, were so easy and fun to make!  We read a book about birds and then I demonstrated how to shape the body, head, beak and tail of the bird out of white model magic modeling clay (I colored the clay with watercolor markers and kneaded it to get the desired color of my bird).  Then I showed the students how to press the eyes into the clay, add the feathers and shape the feet using pipe cleaners (each leg is 1/4 of a pipe cleaner), sticking the legs up into the bottom of the bird.  Last, I hot glued their feathered friends onto small squares of black railroad board.  Each one had a different personality, just like their creators!  

Saturday, May 14, 2011

1st Grade Seahorses


    My first grade students made these beautiful seahorses after we read the book"Mr. Seahorse" by Eric Carle.  While Eric Carle uses painted papers to collage his pictures, we simply drew ours and colored them in with crayons.  I gave the students a variety of different kinds of crayons; glitter, metallic, construction and regular to color their creatures with.  Last, we sprayed them with watercolor spray in Nancy Bottles.  They look like they're floating in a colorful sea and the kids were wowed by the spray.  This was a one part project, including reading the book.  The kids loved their seahorses and everyone was amazed at how beautiful they turned out!

Wednesday, May 4, 2011

1st Grade Paper Sculptures


     Students love making paper sculptures!  They thoroughly enjoy cutting, folding, bending, twisting, tearing and gluing paper.  Paper sculptures are one of my favorite projects to do with my younger students.  It is not intimidating to work with paper, like say, it is to try and draw a person or an animal.  You can't make any mistakes here, really.  It is just freeform imagination at its best!  Plus, you get to put to use all of those scraps of paper you've been saving all year long.  
    There are so many different ways to make a paper sculpture, this is only one.  It is abstract and fun!  First, I begin with showing students a Power Point on Sculpture.  This familiarizes them with the terms and concepts involved in making 3D art.   Then, we make a base for our sculpture by folding a 12" x 18" piece of paper into 4 th's, that the students have colored lines, shapes and designs on with crayons.  Glue the two ends of the paper together as they overlap, to make a tall, triangular base for your sculpture.  You can cut out notches in the sides to invert for an interesting design on the edges.  Last, show the students all the different ways they can manipulate the paper by folding and cutting and tearing and twisting.  Students can glue each piece onto their base in any way they want.  The results are so much fun and it is an hour well spent in the life of a child! 

Friday, April 8, 2011

"Under the Sea" Recycled Art/Mixed Media


    This is probably my favorite elementary art project to date...for sure my favorite 1st grade project!  Ocean scenes are a great theme in elementary art, incorporating science into the art curriculum.  I also tied math into this project, by reading a great book by Lois Elhart- "Fish Eyes", a counting book.  Lois' books are beautiful in their vivid simplicity, her artwork uses bold color and simple shapes combined for eye popping visuals.  The students loved the book, and as we read I pointed out the bright, beautiful fish they could get ideas from.  
    The first step in this multi-step project, was to create the ocean water.  Using a 12" x 18" sheet of white sulphite drawing paper, green, white and blue tempera paint and a 1" brush, the students created their ocean water by blending the paint on the paper.  I gave them their paint in one small metal pan...3 blobs of each color paint- they shared a pan to a group table.  I demonstrated for them how to pick up 2 or 3 colors with their brush at a time and then blend them together by brushing them out on the paper.  I emphasized they should not stir the paint in the pan, making it into one color- the beauty of the water was in all the tints of blue and green they could make on their paper.  They were to start at the top, painting from side to side, back and forth all the way down the paper- never painting in another direction.  Once they were done with the water, we set the painting aside to dry.  
    Next came the recycled portion of this project.  Laminating scraps that I had been collecting in the workroom for some time were my inspiration for the fish.  I have been experimenting with many different recyclable materials this year, and laminating scraps were one of the most challenging.  (By the way, if you have any ideas or suggestions for using them, please message me, I would love to have your input!).  I tried to warp them by applying heat from the oven, the microwave, a hairdryer, a heat gun- they are not to be warped!  If only!  Dale Chihuly projects were my first thought, and still are not out of the question, but they would have been easier to accomplish had I been able to warp the material.  I have other project uses for these that I will be sharing in future blogs, but I digress...
    Paint will not stick- at least not water based- I do not use acrylic with my elementary students, though I could with the older grades, and that could probably work.  I wanted to be able to color the plastic, so I kept at it.  I found that permanent markers work beautifully, and I had some with wide tips.  They colored large areas more quickly than a fine tip marker, of course.  So, I made some drawings on the clear plastic scraps and one was a fish...my project was born!
    Once the fish were drawn on the plastic, the students cut them out and we glued them on their ocean scene.  For some fun detail, we used glitter glue on top of the plastic- sometimes this can fall off when it dries, but I had very few incidents.  Overall, the glitter glue adhered nicely and was a beautiful touch.  The project was going to end there, except for a few white oil pastel bubbles in the water, until a student grabbed a colored oil pastel and without my knowing began drawing some sea plants in the water.  When I saw what they were doing I got so excited!  Oil pastels are beautiful on top of tempera paintings...why hadn't I  thought of extending the lesson with that?  My students ALWAYS come up with better ideas and surprise me with their creativity!  So, out went all the trays of oil pastels and the bottom of the ocean came alive!  
    These projects are so impressive and gorgeous!  The students had a blast creating them and were proud to turn trash into treasure!  I told them that I am a proud dumpster diver...especially when it means that we turn something discarded into a thing of beauty.  :)


Sunday, February 6, 2011

Bodies in Motion!


    1st Graders learned in art class about how their bodies move, with the joints that bend us and allow us to redirect ourselves in a myriad of ways.  We looked at art work by Edgar Degas (his ballerinas), Keith Harrings' wonderful street art of simplified figures moving and dancing, and African American Folk artist Jacob Lawrence, who did many paintings depicting the expression and emotion of the human body.  I asked the students what they noticed about the way the people in the paintings were positioned, and how it made them feel to look them.  What did they think the people in the paintings were feeling?  They said, "Excited!", "Happy!", and one student said,"Tired" when they looked at Degas ballerinas.  I imagine those ballerinas were tired.  I asked them if they thought the artists asked the people they painted to lay down on a canvas so they could trace them.  They all knew that an artist wouldn't do that.  Because an artist that paints people and animals needs to understand the way our bodies move, how our joints bend, and what positions we can get into and which ones we can't.  We talked about the fact that our elbows and knees can only bend one way, and we all got out of our seats to try to bend our limbs as many ways as we could!  We found that we could bend backwards and forwards, from side to side, our head, feet and hands could bend the same.  
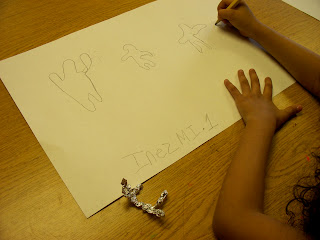
    So, after we made some funny looking poses, I showed the students how they could make a foil figure that they could bend like a real person.  This was a trick I learned at a summer art conference at the museum.  First, take a piece of foil (about 4" x 6") and make two tears, about 2" long, evenly space apart at the top of the piece as it stands vertically long.  Then make one tear up the center, about 2", so that there is foil in the center that is not torn (this will be the torso).  Next, scrunch up (I know, this is highly technical terminology) the foil at the top into three sections, being careful to keep their length (in other words, don't fold it over or ball it up).  The center piece of foil will be the head (this can be balled up slightly to make it look like a head shape).  The two bottom pieces are scrunched up next to make the legs, then finally, the center is scrunched together to make the torso.  I told the students that they couldn't trace their foil figures-remember, a REAL artist would NEVER do that!  I demonstrated how they could bend it in as many ways as they wanted (being careful not to bend it unrealistically), and look at their figure, studying the lines that it made in order to make a contour drawing of it.  And by George, they got it!  I couldn't believe my own eyes!  1st graders making wonderful contour drawings of the body in motion!  They made them standing on their heads, doing back flips, the splits, jumping in the air- they told me what their figures were feeling- "Mrs. Gallow, my person is so happy because they got an A on their schoolwork!"  They absolutely LOVED their foil people and wanted to take them home.  This was a two part project, so we needed to keep them to help us with completing our art the second class.  I paper clipped them to their work as I put it up.  But, I told them, ask your mom or dad for a piece of foil from the kitchen and show them what you can do.  Make one at home and practice your drawings of people moving.  They will be amazed! The second art class they could take them home.
    Finally, after their contour drawings were done in pencil, I had the students trace them with a sharpie and color them in with colored markers.  I encouraged them to make more concentric lines going around their contour figures and to get creative with what types of lines and designs they could add to their artwork.  The drawings are electric with energy and so much fun!  I think that my art students, in first grade, are well on their way to understanding how to draw a person in motion... I can only imagine what their going to be able to do by 5th grade!